Guides
Introduction
About iLovePDF Signature
In brief, iLovePDF Signature is a service provided by iLovePDF to sign and send documents which need to be signed.
If you need to sign a document yourself, you can sign it digitally using iLovePDF Signature.
If you need someone else to sign a document, you can use iLovePDF Signature to request that person's signature and collect the signed document, without the need for printing and scanning.
With iLovePDF Signature, you can do that whole process online, completely paperless, while safely delivering a legally valid document.
Signature types
There are different types of electronic signatures, all of which are legally binding and can be admitted as evidence in a court of law. Choosing one or another will depend on your needs.
Simple signature: An electronic signature is defined as "data in electronic form which is attached to or logically associated with other data in electronic form and which is used by the signatory to sign" (eIDAS Article 3). That's why the basic electronic signature, often referred to as 'simple', offers the lowest level of compliance.
Digital signature: A Digital Signature signature, like a conventional handwritten signature, identifies the person or entity signing a document. However, unlike a handwritten signature, a Digital Signature is difficult to forge because it contains encrypted information that is unique to the signer. It can be easily verified and informs receivers of whether the document was modified after the signer initially signed the document.
When you apply a Digital Signature, iLovePDF Signature creates a hash from the signed document. This is an encrypted value which includes all of the document information and file properties. Through their cryptographic providers, iLovePDF certifies this hash with its unique certificate and the timestamp of certification. Finally, iLovePDF generates an Audit trail - also certified- containing detailed information of the entire signature process.
Advanced Electronic Signature: An Advanced Electronic Signature (AES), can be activated on top of a Digital or Simple signature by using any one of our unique identity verification features. Under eIDAS, an AES must meet the following requirements:
- Be uniquely linked to the signatory.
- Capable of identifying the signatory.
- Created using electronic signature creation data that the signatory can, with a high level of confidence, use under his sole control.
- Linked to the data, signed in such a way that any subsequent change in the data is detectable.
Receiver types
Different signature roles determine the behavior and actions available for a user.
Requester: A Requester refers to someone who prepares and sends the document to someone for signing. Once the person has signed the document, it will be sent back to the Requester.
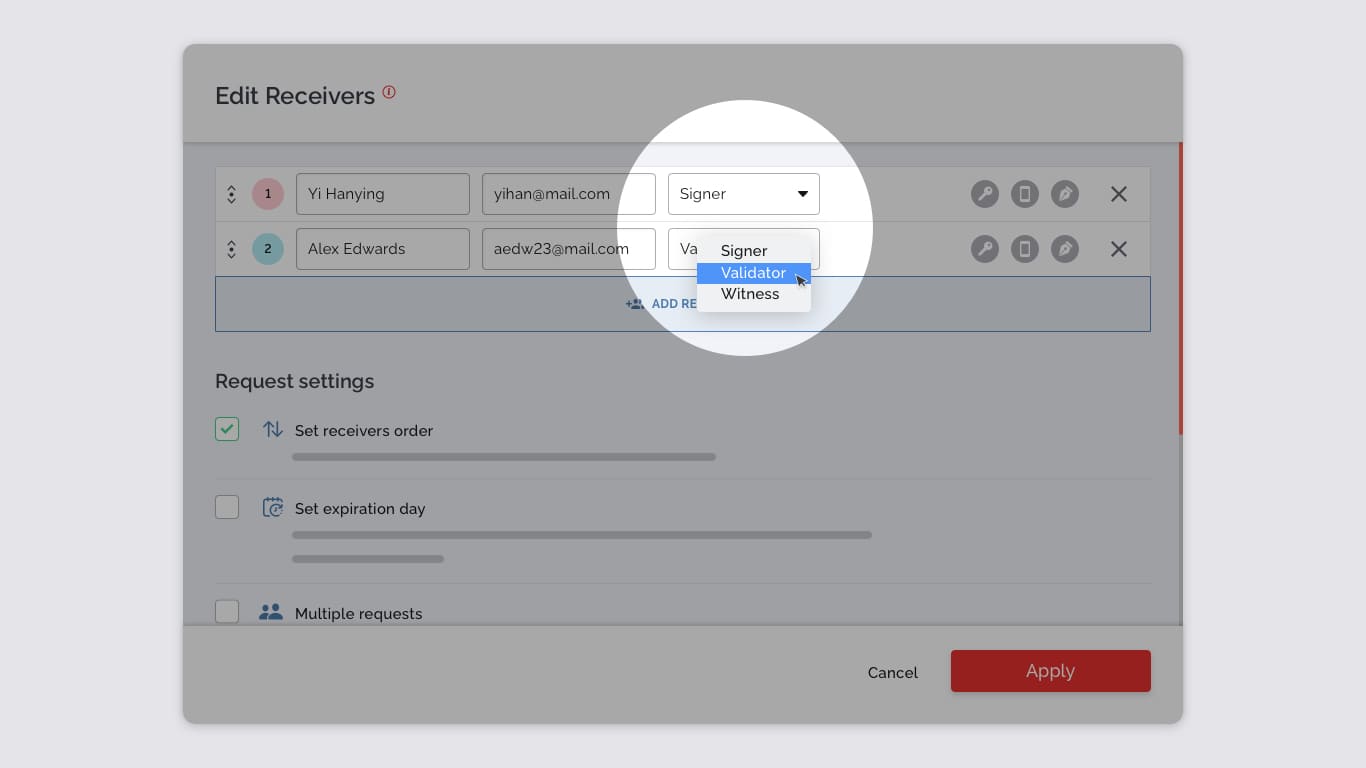
Receiver: A Receiver refers to someone who receives a document. Each document must have at least one Receiver. A Receiver can have different roles in the signing process:
- Signer: Needs to sign. Signers are recipients who must sign, add initials, name or add data to form fields on the documents in the signature request.
- Validator: Needs to validate. A Validator is commonly used to either validate the content of the document or the signing process once it is completed.
- Witness: Receives a copy of the original document and the completely signed one as well. Use this type if someone must receive and view the document only, but they don't need to take action on it.
Signature Requests
A Signature Request is the process of preparing a document, sending it out for someone to sign, and collecting it back using iLovePDF Signature.
You can include as many Signers as you wish in your Signature Request, and request for them to sign as many times as necessary in the document. Notethat for Digital Signatures, each document will need its own certificate.
Signer fields
Once your request includes all the necessary documents, Receivers, and messages, you can set up the document with the field elements indicating your Signers to provide their signature, initials, or other information. There is a unique set of signing fields for each Receiver.

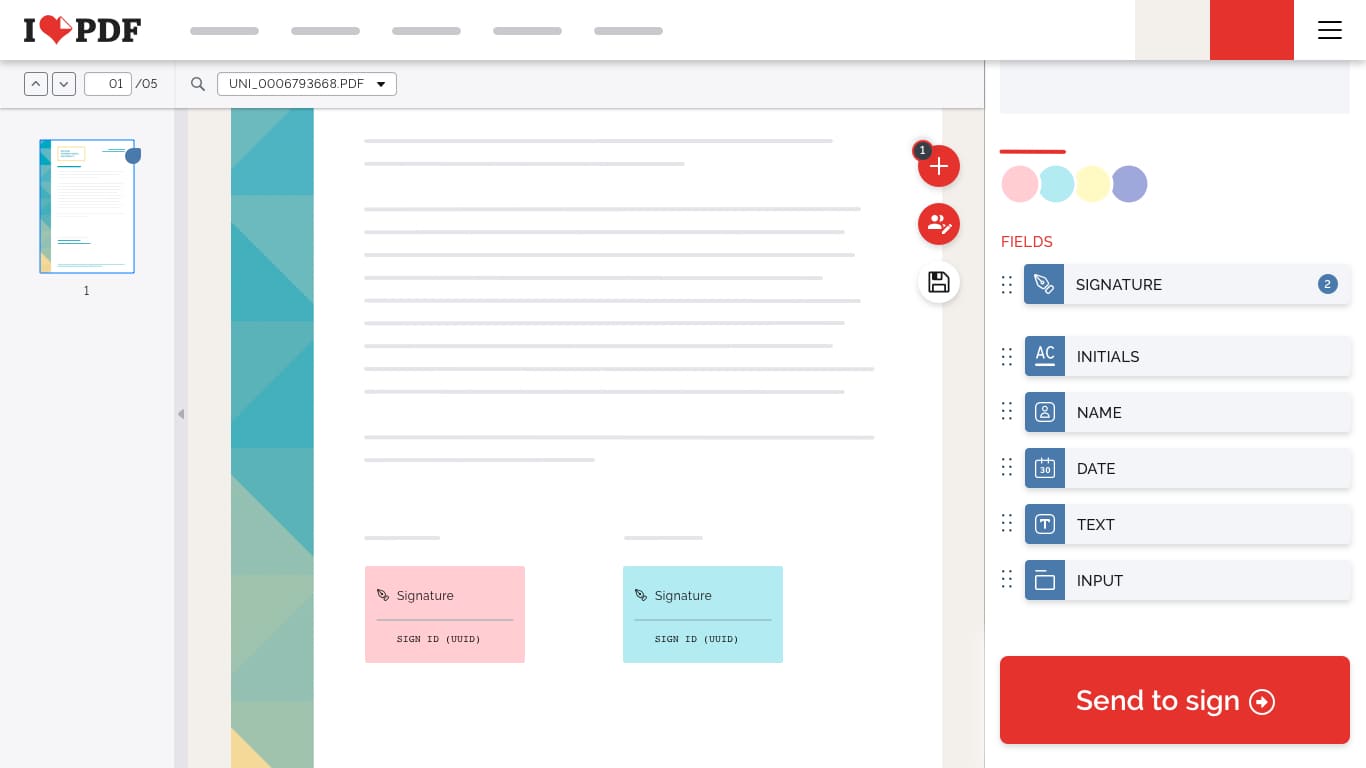
Please find below a quick summary about the elements you can place into your document workspace:
- Signature: Place the signature element exactly where you expect your Signers to place their signature. Please note that the default size of the signature field is considered the recommended minimum. Modifying the signature fields in size will affect the Signers' signatures size.
- Initials: Some agreements ask that you add the signers’ initials too. Sometimes with initials only, a document signature is valid. Place initials where you want a Signer to write his/her initials.
- Date: Date fields will carry the date when the signature of the respective Signer was placed during the final signing process. This field is not editable in its content.
- Text: The Text field allows you to add new text to the document.
- Name: Place this field wherever you would like Signers to place their full name.
- Input: Use this field if you want the Signer to manually input some information on your contract. As a Signer, this will be used as a standard text input. As a Requester, this will be used to indicate where to write specific information.
Prepare
Requesting signatures
With iLovePDF Signature, getting signatures on a document is quick and easy. You simply upload the documents that you want signed. iLovePDF Signature keeps them safe. Then you add the contact information for the people who need to sign and indicate the information they need to add, such as a signature, initials, or their name.
The basic steps for creating and sending a document for a signature are as follows:
- Upload your documents. iLovePDF Signature supports documents in PDF format. You can select files from your device or from cloud storage providers such as Google Drive or Dropbox.
- Add Receivers. Specify who receives your document and what action you want them to take.
- Set up your request. For each Receiver, add fields to your documents to gather the desired electronic signatures and other information, such as title, initials, name and signature.
- Review and send. Review your field setup and send the document to your receivers.
Templates for Signature Requests
You can use templates to create pre-set Signature Requests. It can include the document set up to be signed as well as information such as the Receivers’ roles, routing order, and authentication methods.
After creating a Signature Request, you can save it as a template for future needs, which is especially useful for recurring Signature Requests. You can do so from the ‘Upload’ screen by selecting a pre-saved template instead of uploading a new document.
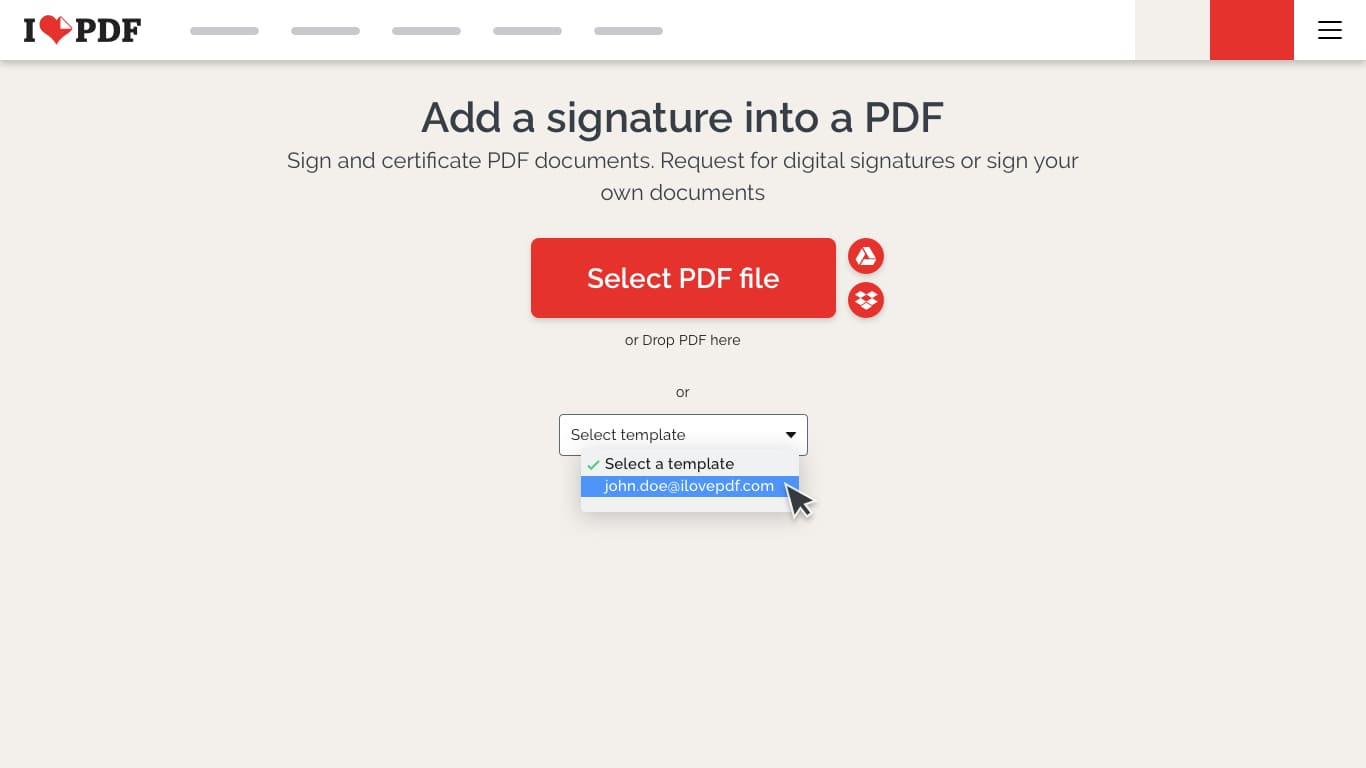
You will only need to update Name and Email information of your Receivers each time you request from a template.
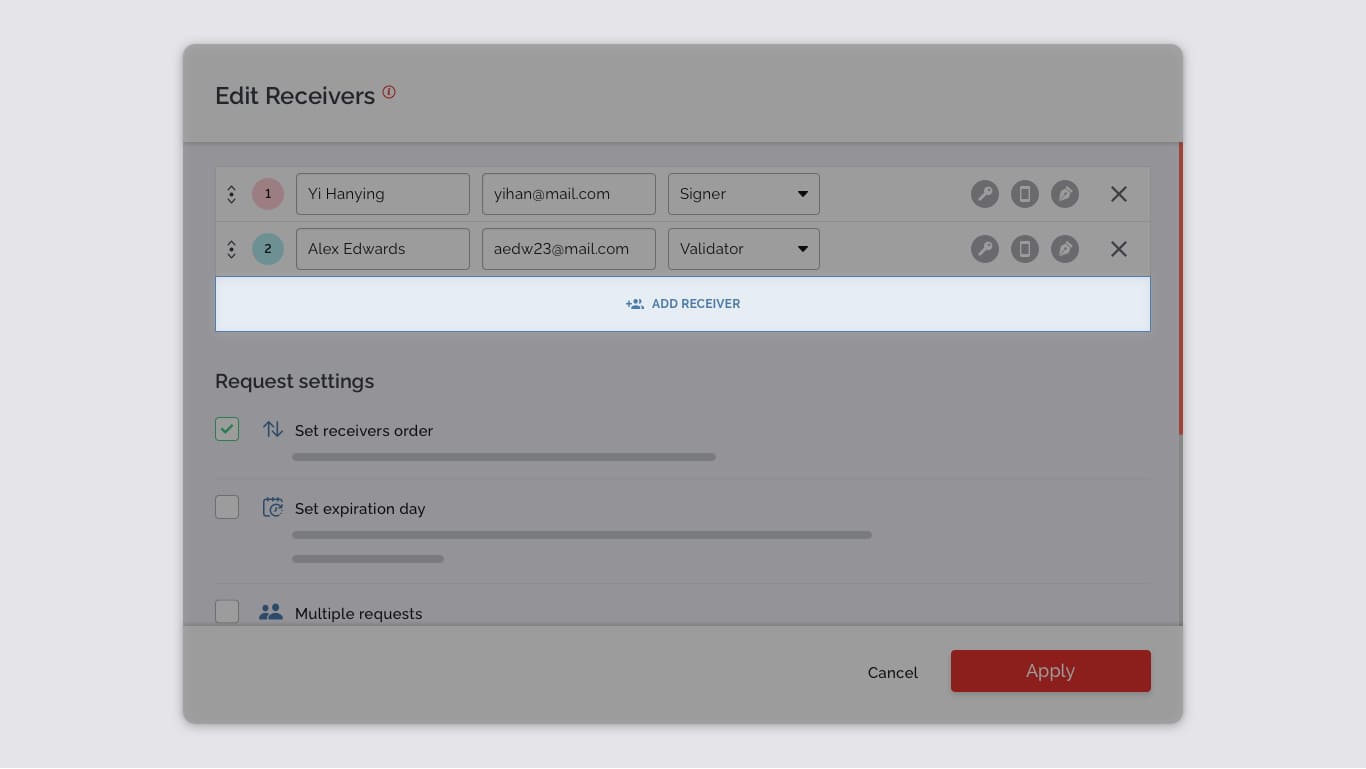
Adding Receivers
Once you select the documents to send, you can add the details of the Receivers who will receive and sign your documents, or just receive a copy as a Validator or as a Witness. Receivers do not need an iLovePDF account. They can still open your document and complete their signing action.
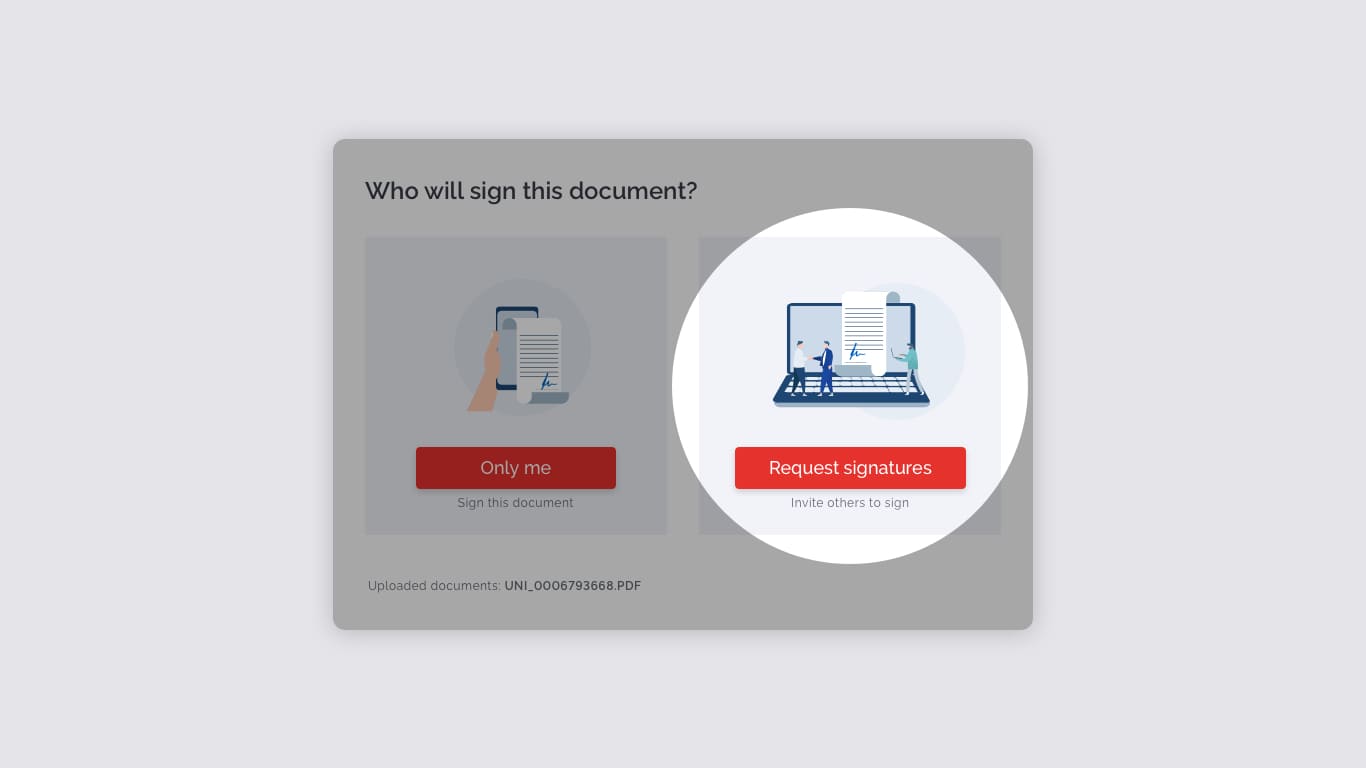
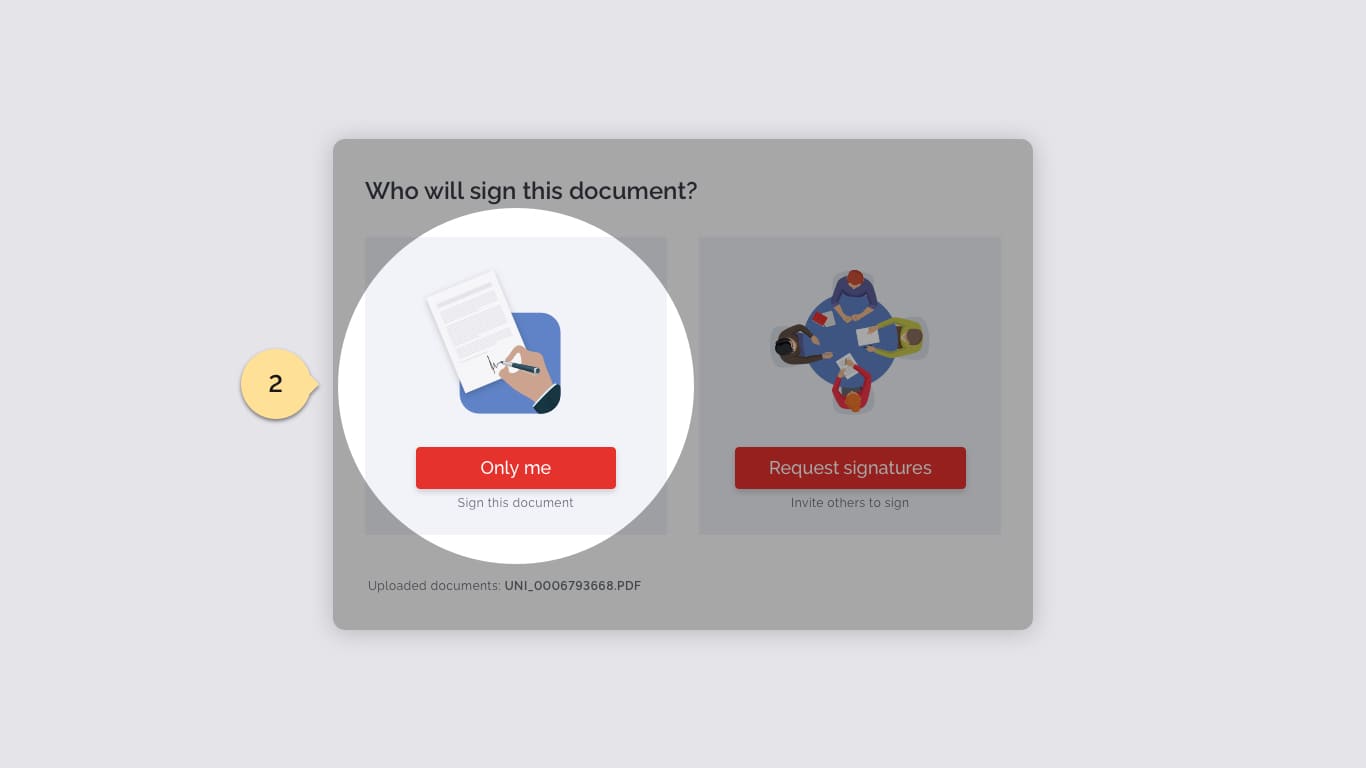
After uploading the document that you want to have signed, you have two options: Sign your own document or request others to sign it. In the second situation, you will add Receivers to the document by clicking the Add Receiver field below the name and email address fields.
- Click on the Request for Signature button.
- An Add Receivers pop up screen will appear. From there, enter the name and email address of your first Receiver. Be sure to double-check the email addresses of each Receiver.
- Set a role for the Receiver from the drop-down list: Signer, Validator, or Witness.
- You can select to protect your request with a password and SMS validation. You can also set which signature type each Signer must use.
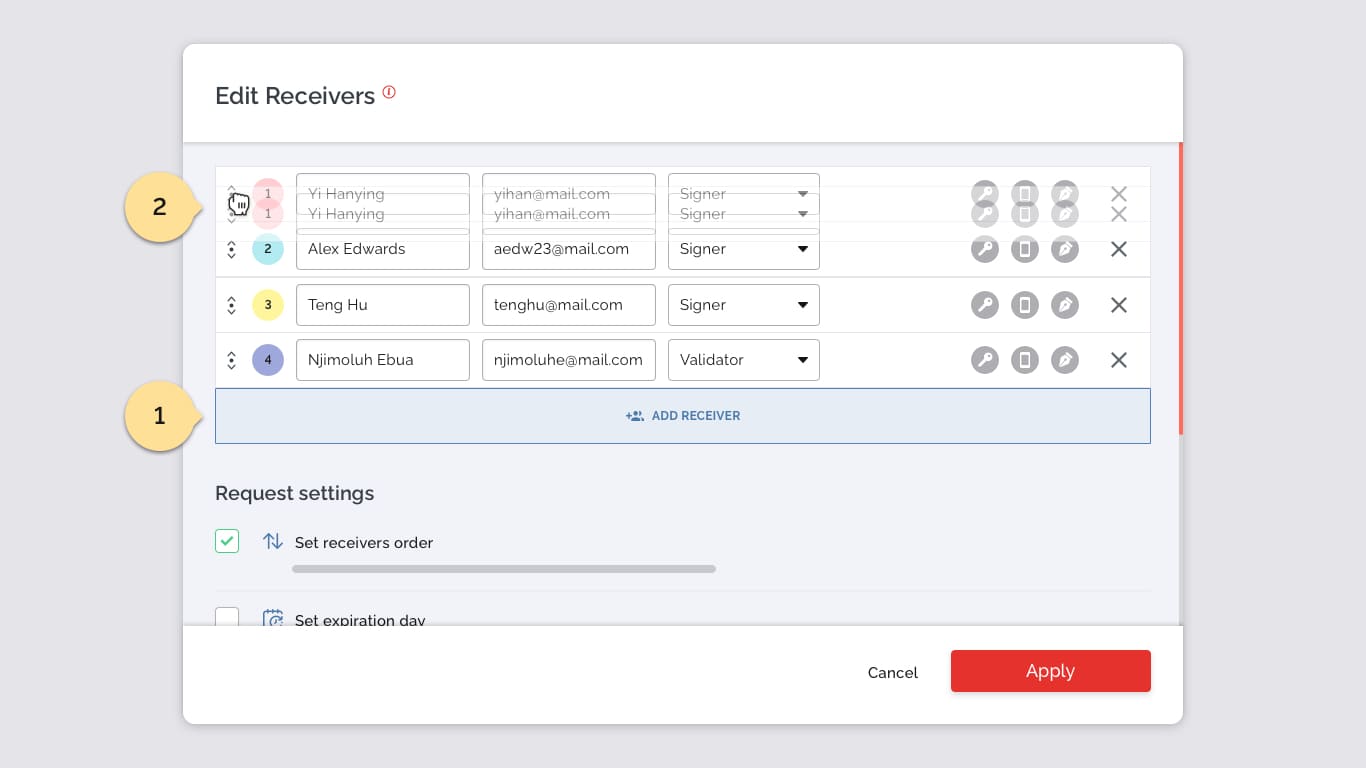
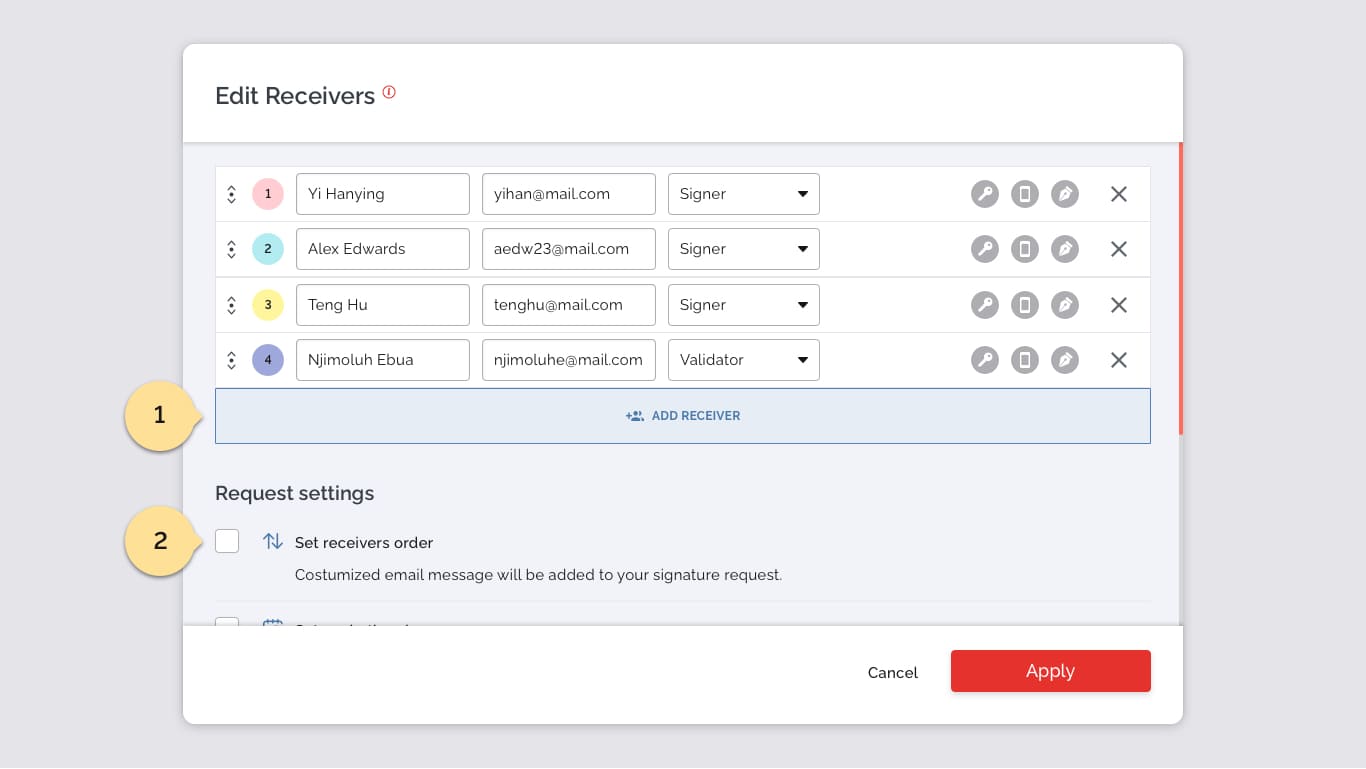
Organize Receivers
When sending documents to more than one person at a time, you may need to specify a signing order. Follow the steps below to set the sending order for your request.
When Receivers order is mandatory:
- Add your Receivers as explained above.
- Specify your Receivers’ roles and adjust the sending order by selecting and dragging the Receiver rows.
For a parallel request:
- Add your Receivers as explained above.
- Un-tick the Set signing order check box.
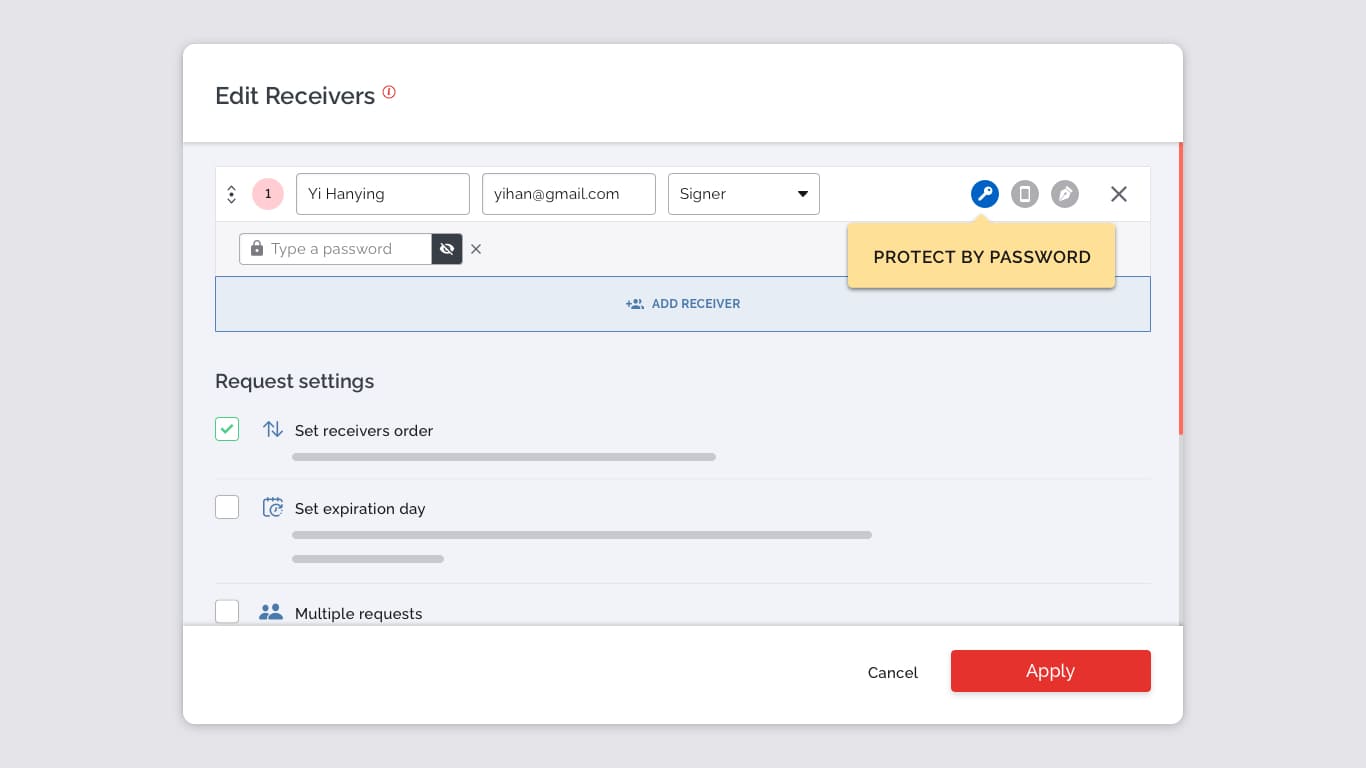
Password Protecting requests
Adding an access code for your Receivers adds an extra level of security to your documents because only the Receivers should know the access code. It reduces the risk of the document being signed or viewed by unauthorized users.
You can share the code in any way that you wish, such as by phone or in a separate email message. However, do not include the code in the document message, as this would reduce the security value of the code. Your Receivers must enter the code correctly in order to view and sign the document.
Follow the steps below to learn how to set Password Protection to your Signature Request.
- Upload the document you want signed.
- Click the 'Add Receiver' button to add at least one Receiver to the Signature Request.
- On the Receivers row, click the icon and set a password in the box provided. No input confirmation is needed.
- Click on the 'Apply' button to save and apply your Receivers list and set passwords.
SMS Signer Authentication
SMS Authentication is a standard security feature aimed at preventing unauthorized signing of your documents. Verifying the Signer via SMS ensures that the owner of the phone who receives the code belongs to the Signer. You can set this option for individual Receivers, requiring them to provide an access code to prove their identity. This method is based on SMS. You can select it for any or all of the Receivers in your request.
When you select SMS authentication, you provide the phone number of the Receiver. The number must be able to receive SMS text messages.
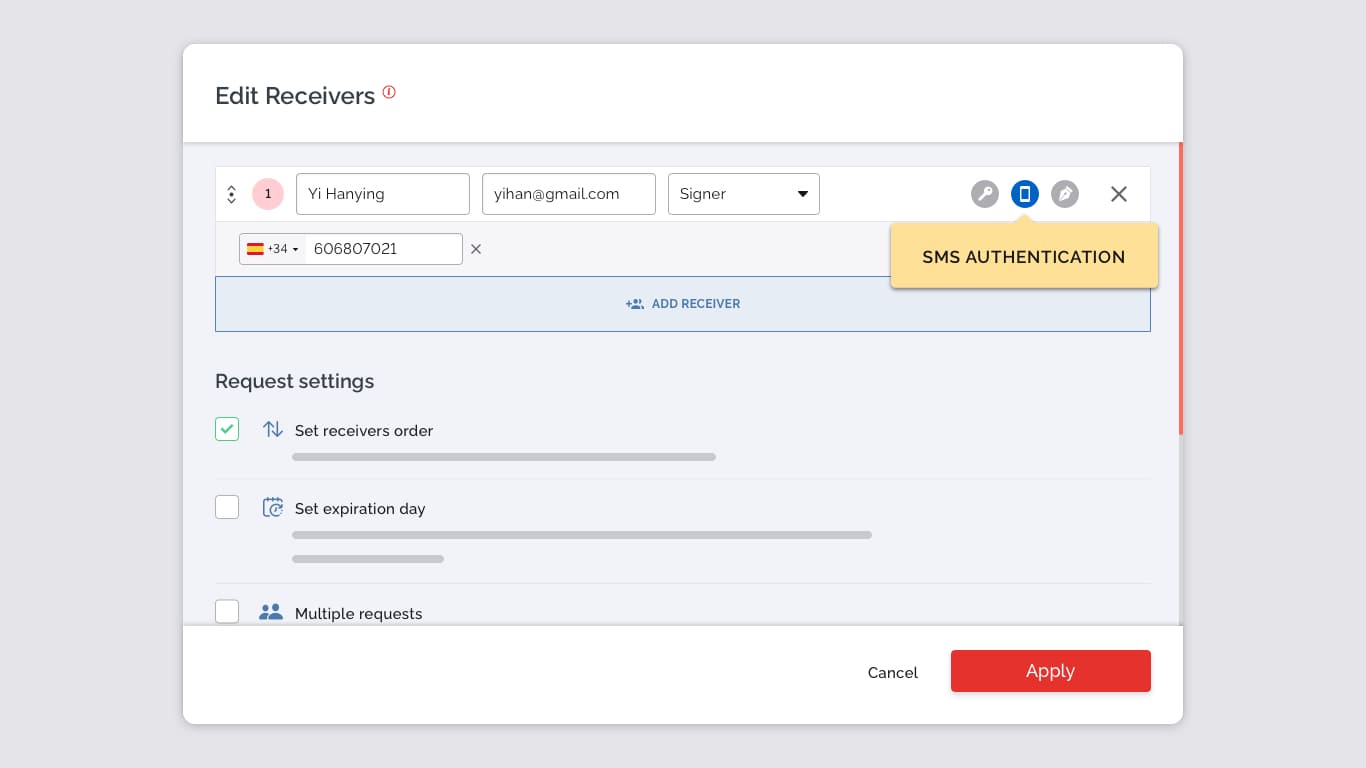
- Upload the document you want signed.
- Click the 'Add Receiver' button to add at least one Receiver to the Signature Request.
- Click the icon and enter the Receiver's phone number in the box provided. No confirmation is needed.
- Click on the Apply button to save and apply your Receivers list with their phone numbers set up.
The Receiver will have the option to contact you in case they lose or do not receive the SMS code.
Setting up your documents
A document can be set for a Signature Request or to sign your own document
Set up a Request document
Once you are done adding Receivers to your request, you will get to the document setup screen.
From here you will be able to navigate through your document and read it using our PDF viewer.
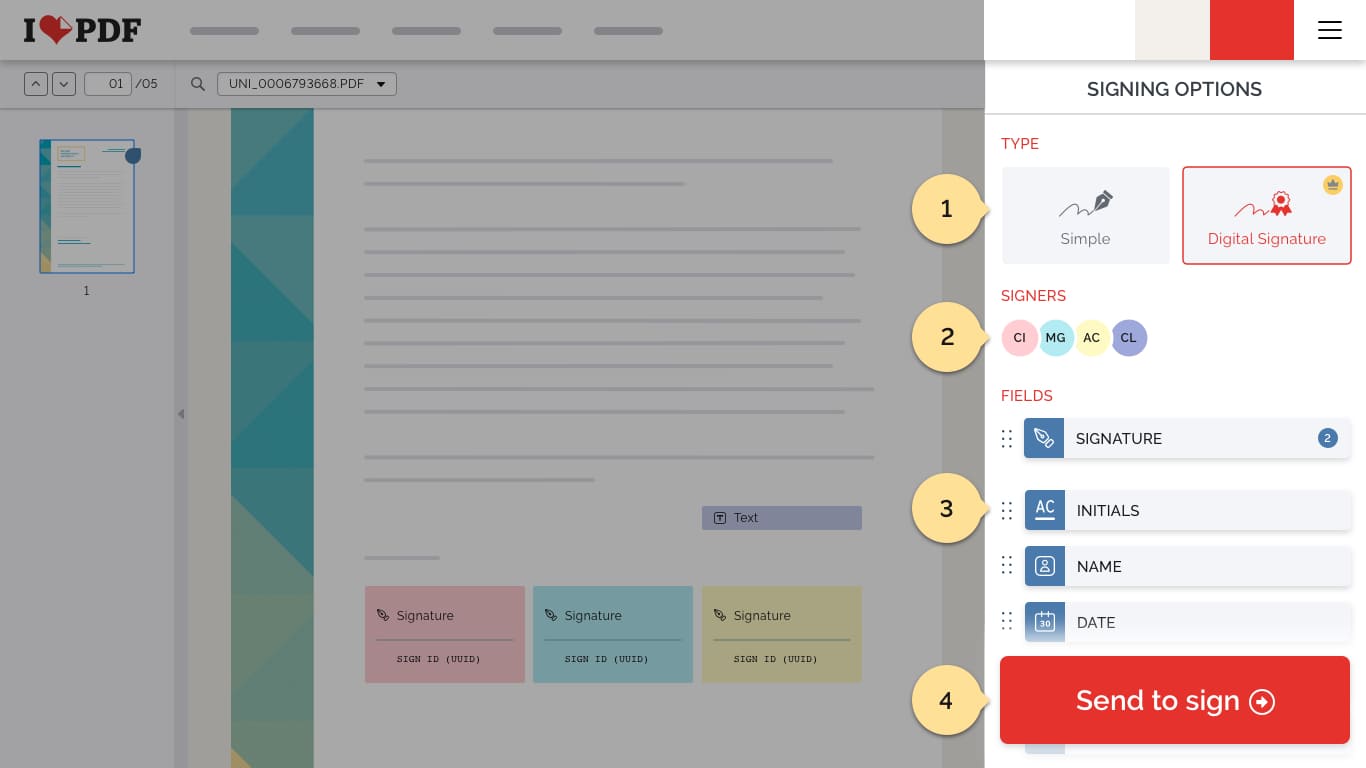
On the right side, you will find all the necessary elements to set up your document. From top to bottom:
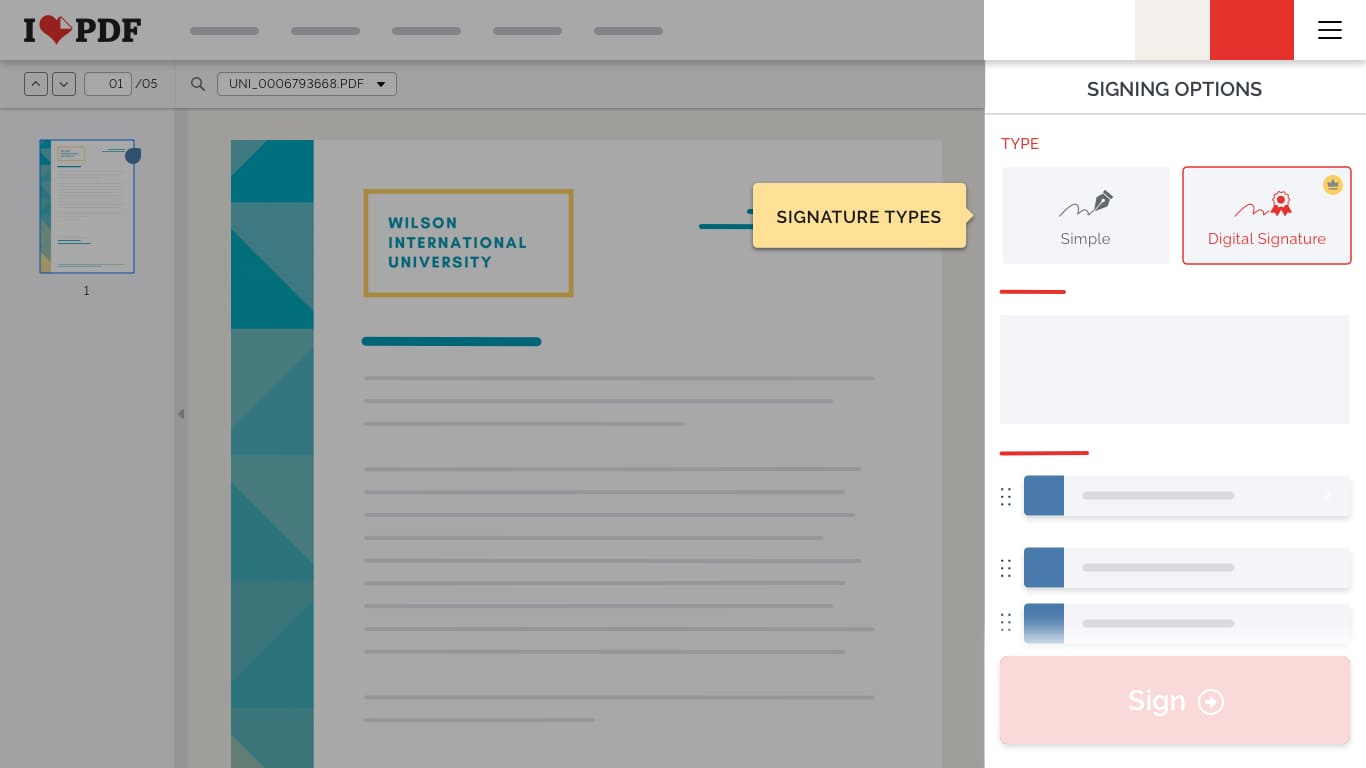
- Choose between Simple or Digital Signature.
- Below this option you will see a list of the Signers’ initials. Click on any of them to add signature elements for this Signer.
- Add signature fields to your document
- Once at least one Signature or Initials field is placed on the document for every Signer, you will be able to click the red 'Send to sign' button.
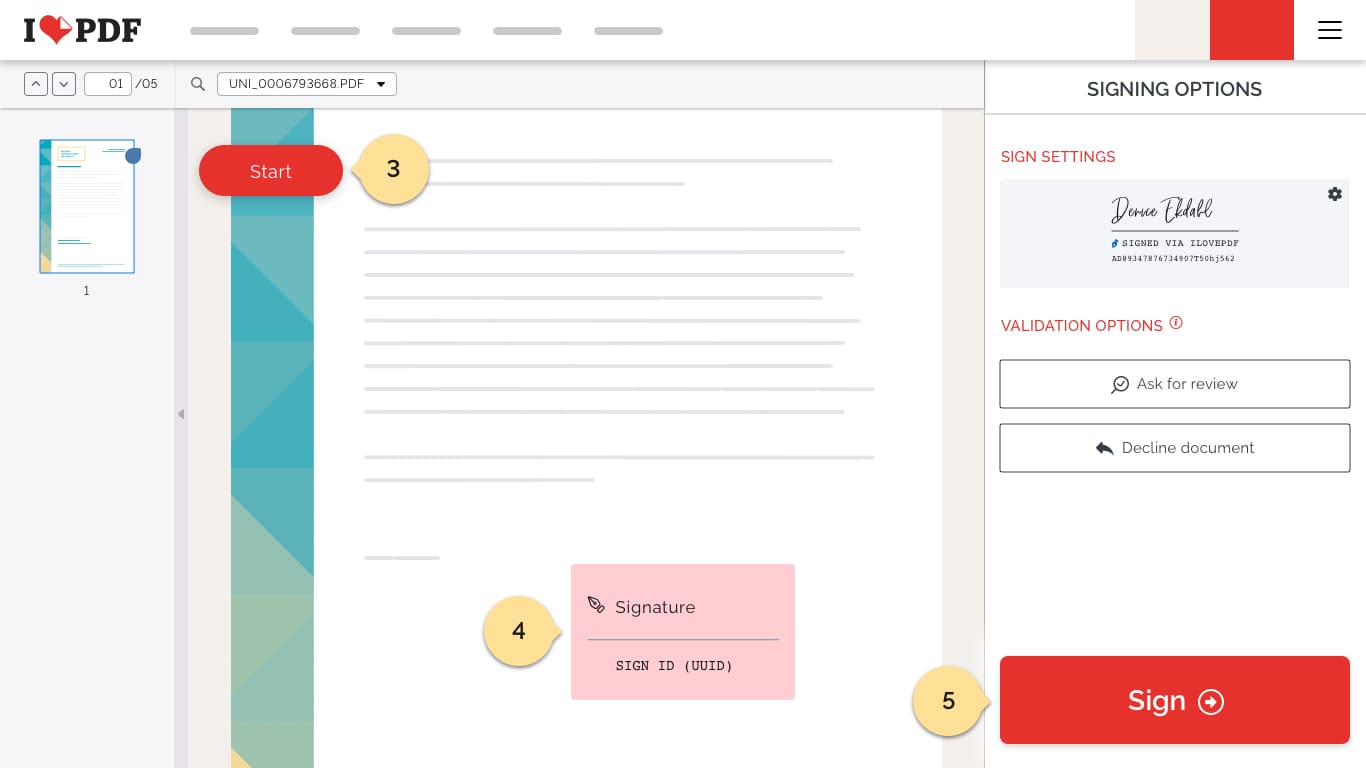
Set up your own Signature document
The process to set up your own Signature document is the same as with a Signature Request. The main difference is that in this case, you are the only Signer, and every field placed on the document will be automatically filled in with your own information.
Here you can also customize your own signature, name and initials, and check the results directly from the document viewer.
Sign
Signing your own document
Sometimes you just want to sign a document yourself—just you, with no other Signers– and then send a copy of the signed document. This could be a document someone sends to you outside of iLovePDF Signature, or a form you need to fill out and send to someone. With iLovePDF Signature, you can quickly upload a document to our tool, sign it, and download your document.
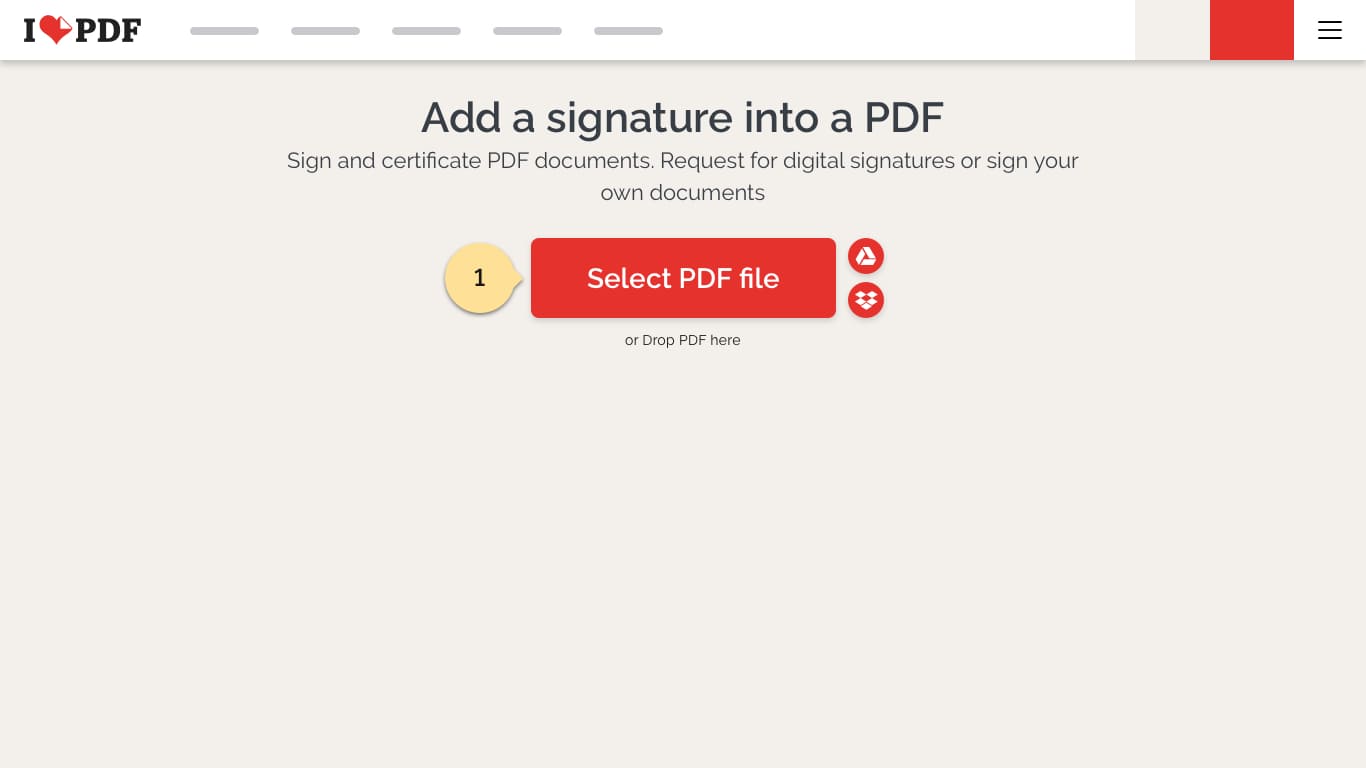

You can start a new document from any of the 'Start signing' buttons in the iLovePDF Signature website:
- Upload the document you want signed.
- Select the 'Only me' option.
- You will arrive at a screen to set up your document pages.
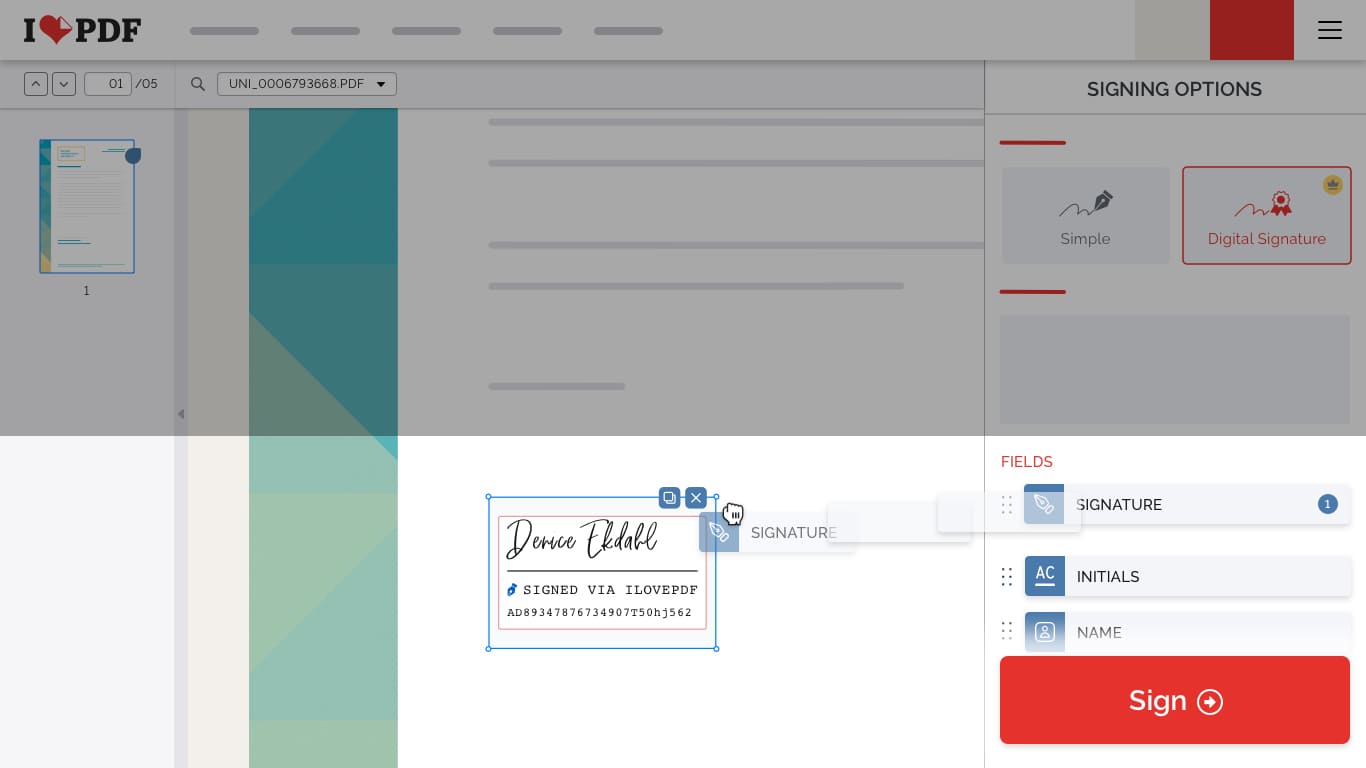
- On the right sidebar, choose between the signature types Simple or Digital.
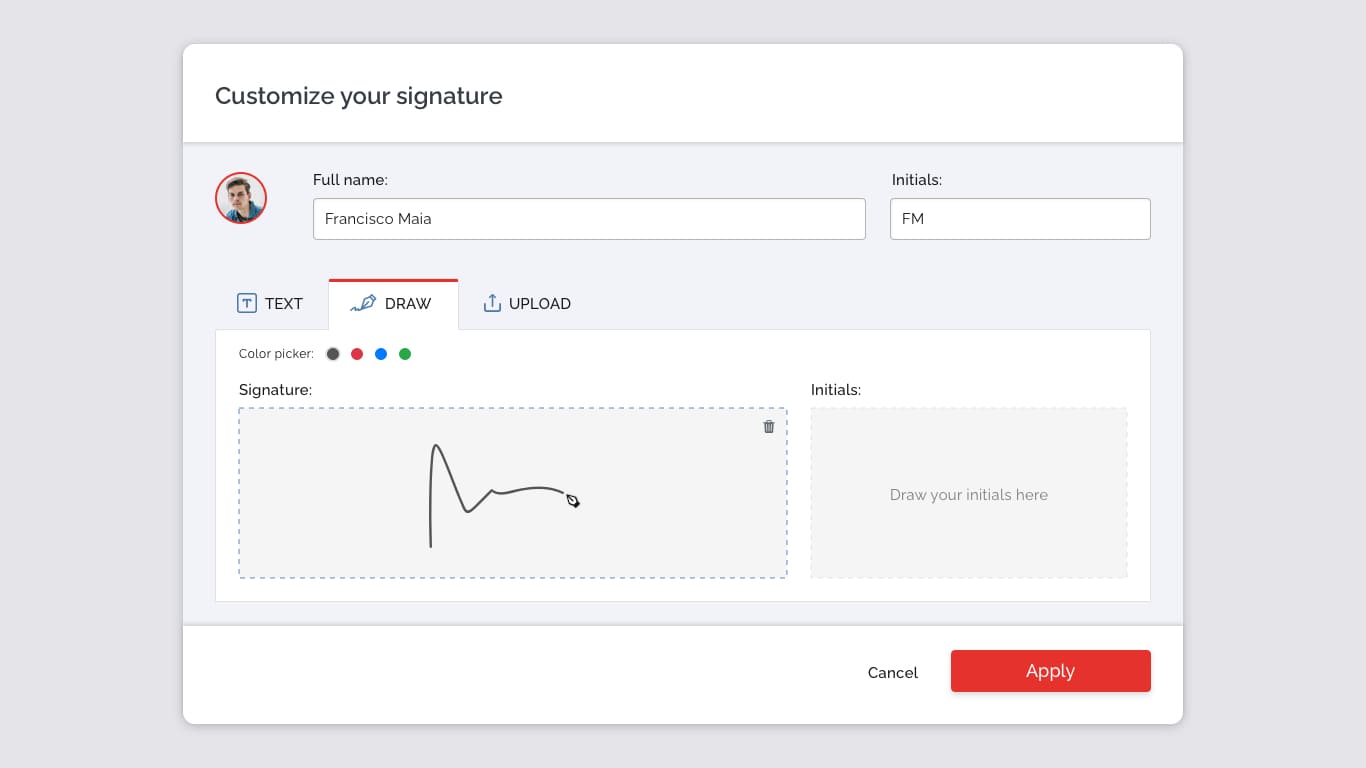
- You have the option to Customize your Signature by clicking on the icon. From here, you can choose to type, draw or upload your own signature.
- Drag the Signature element from the right sidebar menu to your document.
- Finally click the red Sign button to process your document.
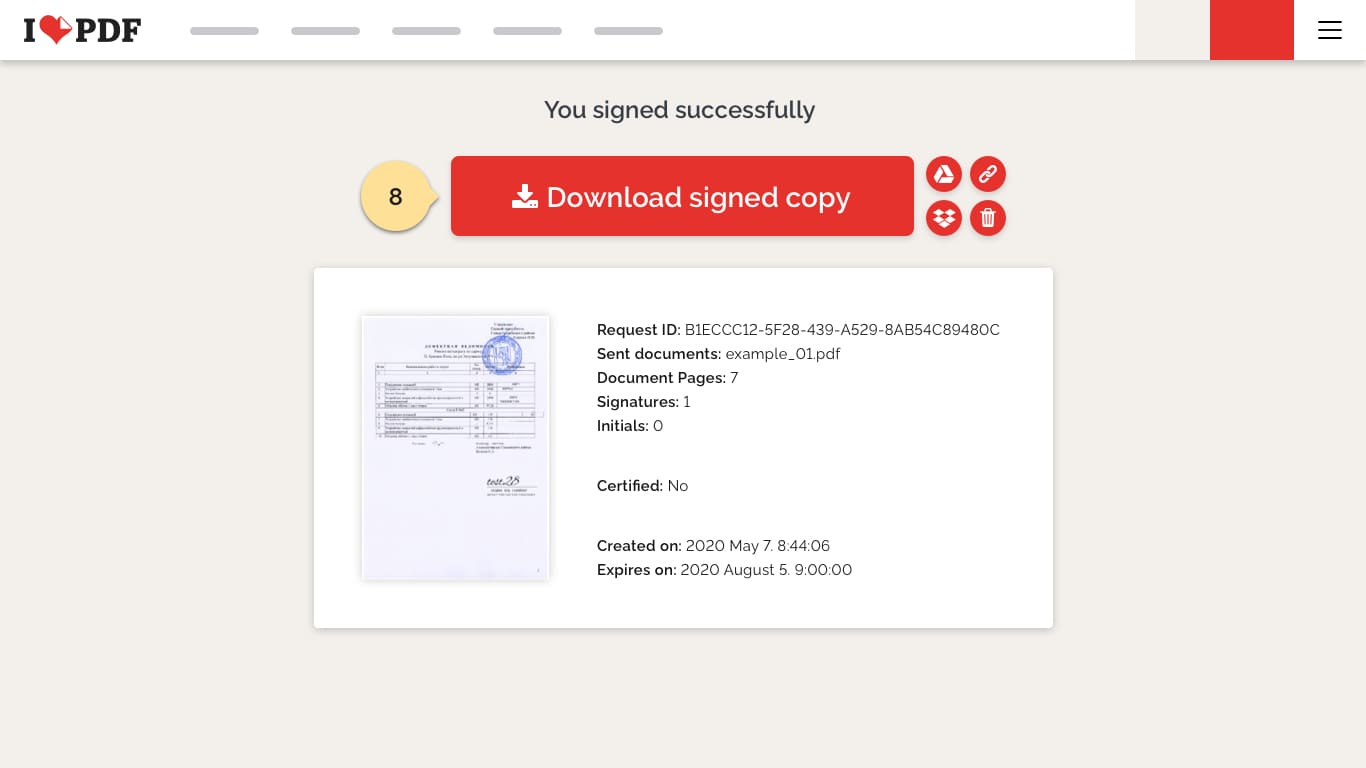
- Your document is now signed! You will be redirected to a download screen where you will be able to download or share your signed document.
carroussel
Signing as a Receiver
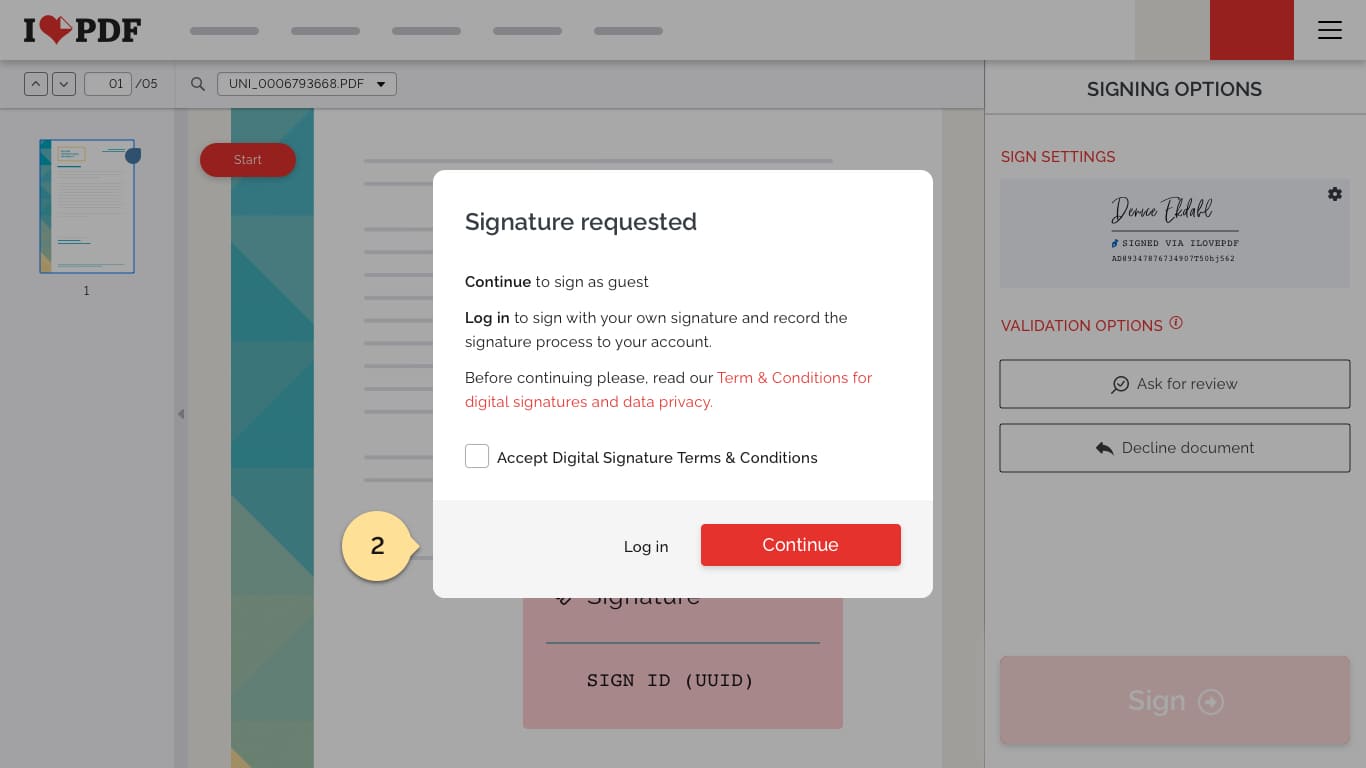
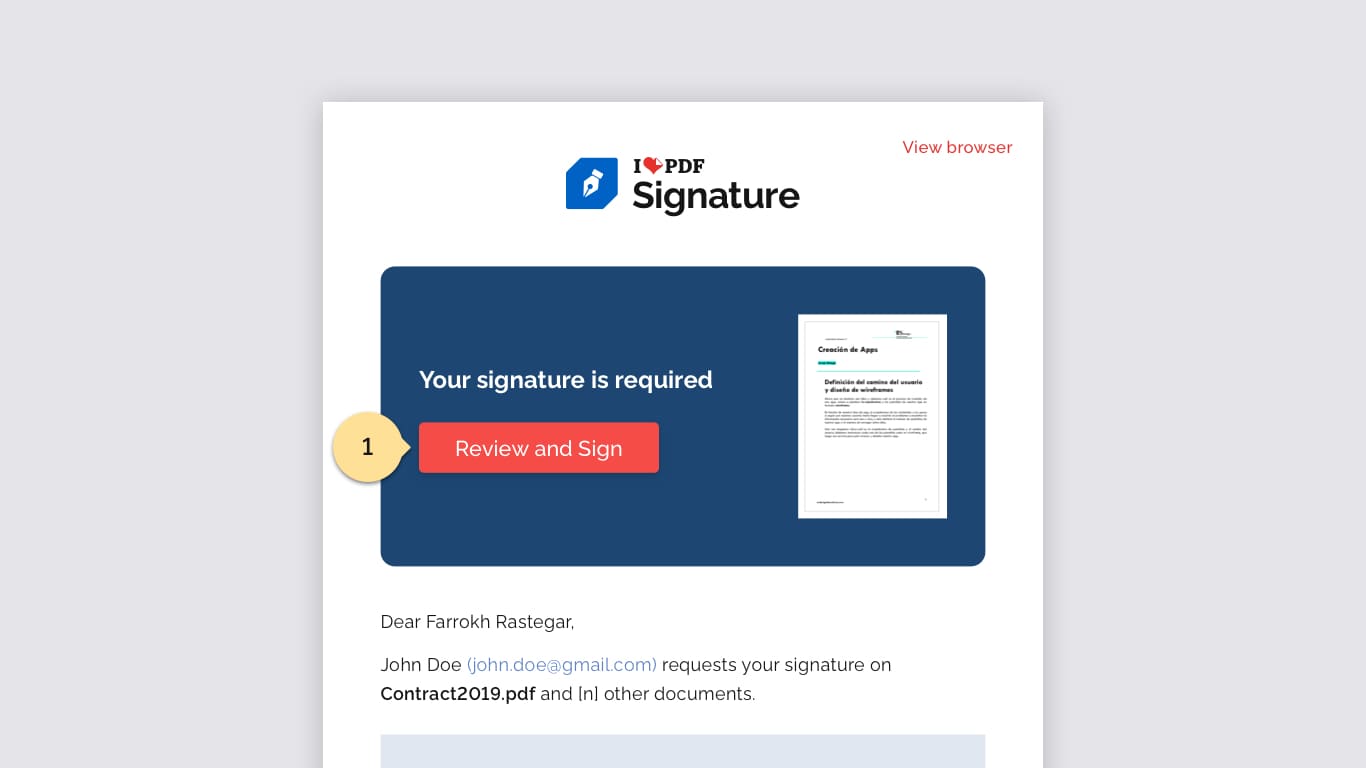
When someone sends you a document requesting your Digital Signature, you will receive an email from iLovePDF Signature sent on behalf of the sender. To sign the document, follow these steps:
- Open the email and review the message from the sender. Click Review and sign.
- You can either log in with your iLovePDF account or sign in as a guest.
- Click on the Start button.
- Click on the boxes to sign where you are required.
- Once you have finished signing in all of the required boxes, you can select the red 'Sign' button. The signed document will be sent back to the sender.
Alternatively you will be able to share the document for approval or decline to sign this document

Customizing your signature
Changing your signature style or creating a signature in iLovePDF Signature is a great way to customize and personalize the signing process. Signature features a set of predefined signature styles to choose from. You can also draw your signature with a mouse or pen tablet to use in all of your signing sessions.
The following are the three different ways to set your signature:
- Text: After introducing your name and initials, select any of the pre-formatted signature styles.
- Draw: Create a freehand drawing of your signature and initials.
- Upload: Upload an image file containing your own signature and initials.
You can always edit your signature from the icon on the right side panel.
Sharing documents for validation
As a Signer, you may need a second opinion from someone to ensure that the content of the document you are going to sign is correct. To do that, you can send this same document to a Validator of your trust. Follow these steps.
- On the right side panel, click the Ask for review button.
- Insert the email of your Validator and type an optional message.
- You will now see real time information about the status of your advice request in the right side panel.
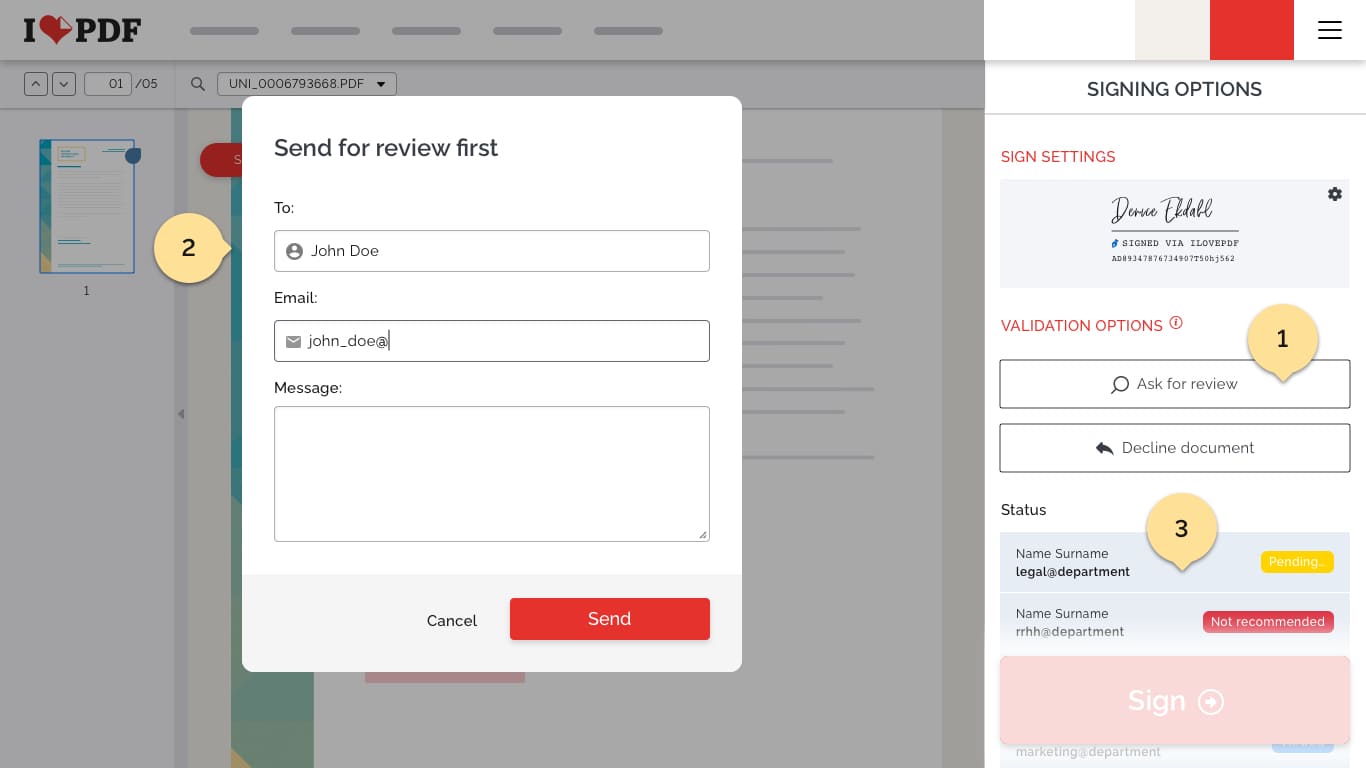
Note that it isn't necessary to wait for a response from your Validator. You can still sign or decline a document at any moment.
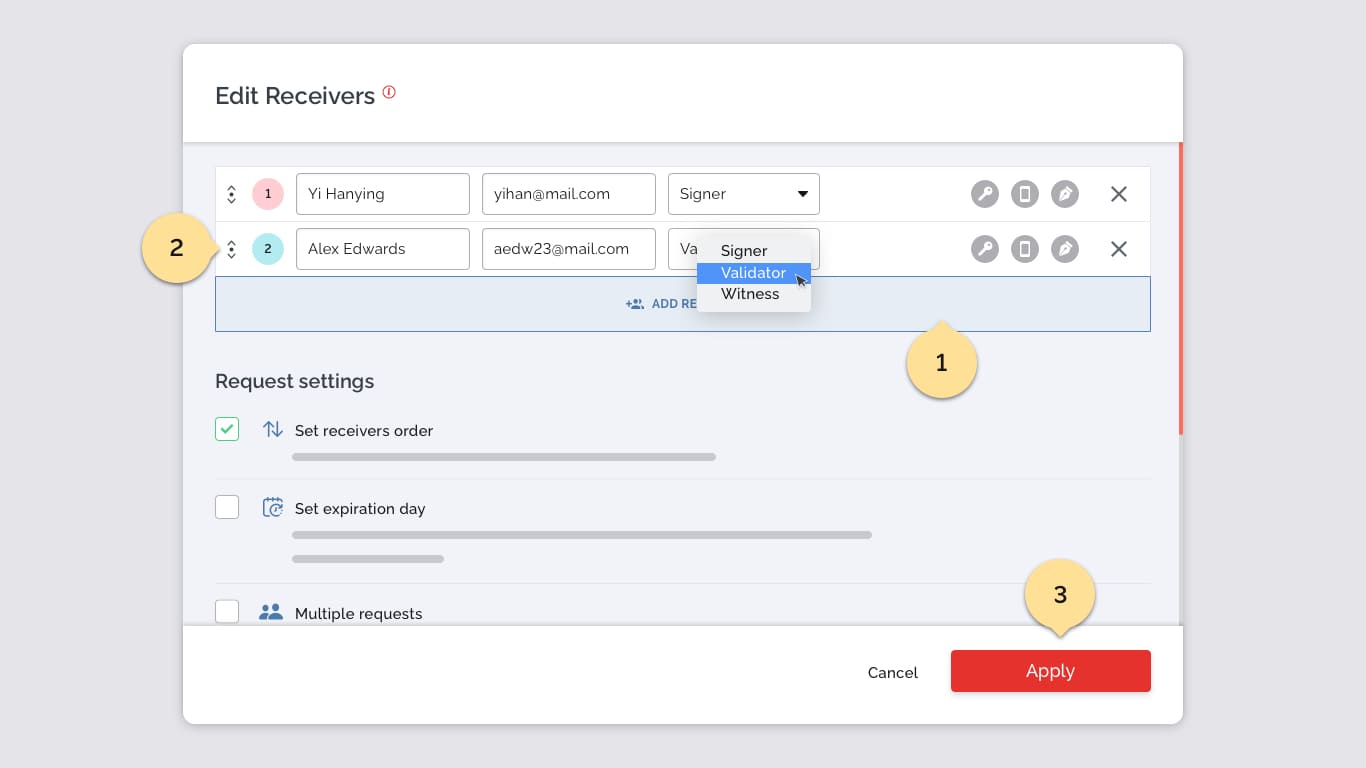
As a Requester, you can ask for a validation too. In this case the Validator will be able to stop the whole signing process no matter if the document was already signed by a Receiver or not.
- In the Add Receivers popup screen, click the Add Receiver button.
- Insert their name and email, and change their role to 'Validator' from the dropdown options
- Once you have finished adding Receivers, click the 'Apply' button to save all the Receivers’ information of this request.
Just like all Receivers, the Validator will receive an email to review the document, but he/she will be limited to validating or declining the document.
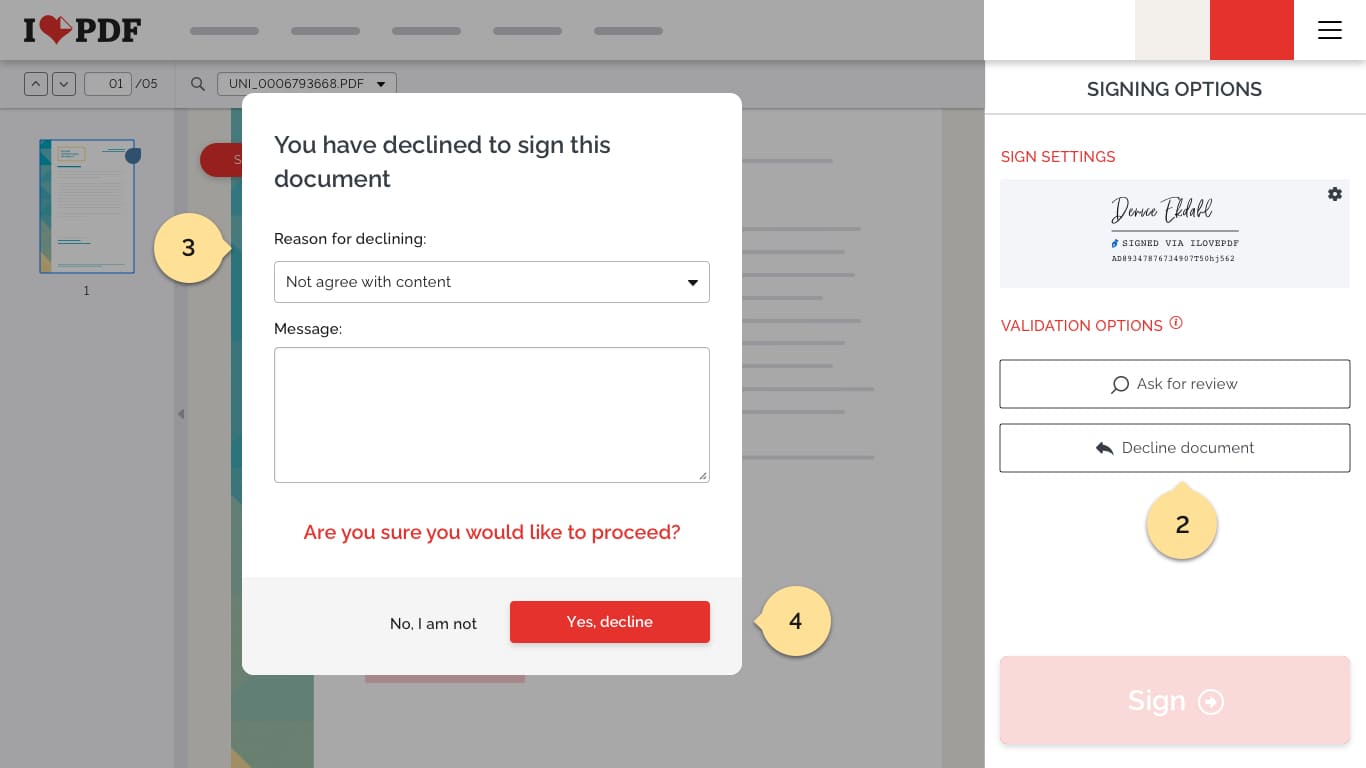
Declining a Signature Request
As a Signer, there can be a number of reasons for declining to sign documents. You could notice an issue with the document itself or some of its content and not agree to sign it.
To decline to sign a document, you need to do the following:
- Open the email request and click the Review and sign button.
- Once on the document signature screen, click the Decline document button on the right side panel.
- A popup will ask you to choose a Reason for Decline and optionally write a message with your disagreement reasons.
- Click on the Send button to decline to sign the document.
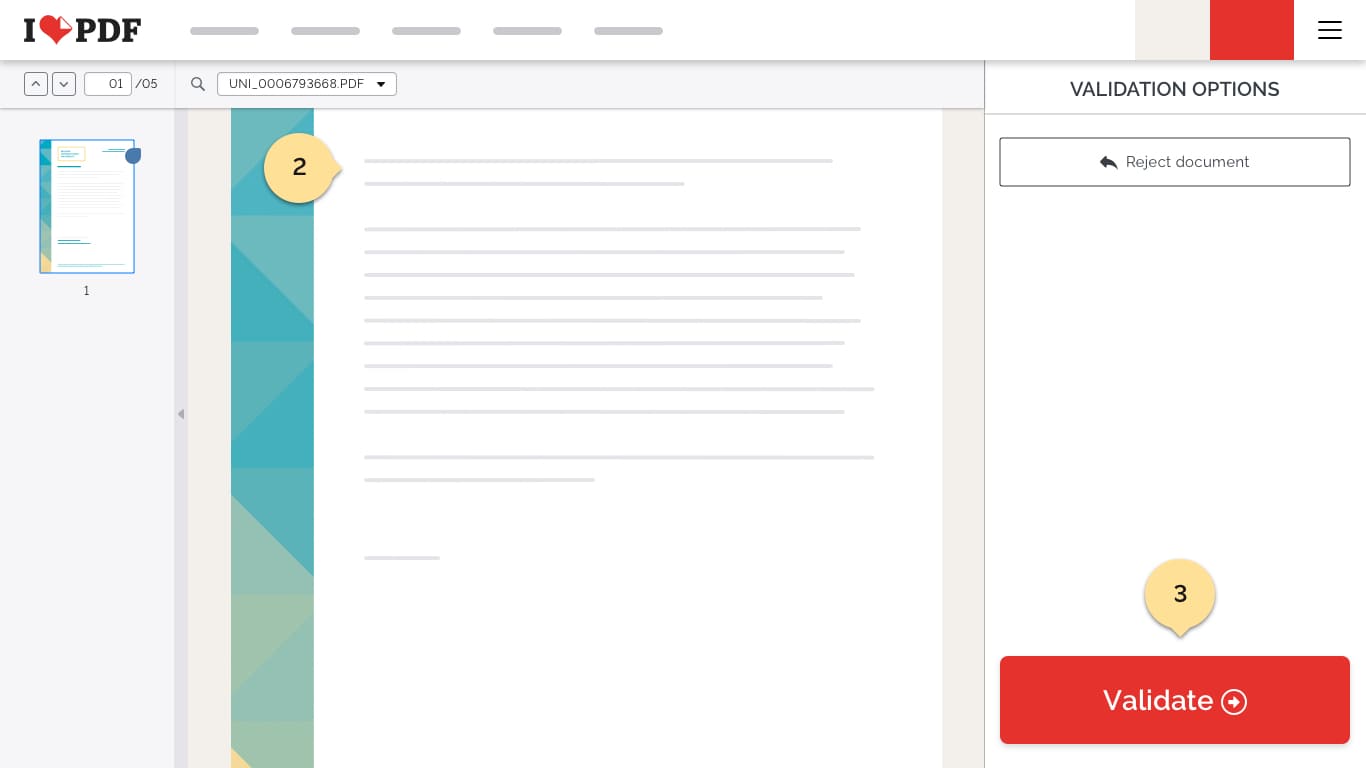
Validating a document
Document validation gives you the option to ask someone to validate documents before completing the signature process. This gives you and the rest of the Signers the power to proactively protect yourself against adding your signature to a document which might contain incorrect data, and increase the accuracy of the information you sign.
If you are required to validate a document, simply follow these easy steps:
- Open the email request and click the Review and validate button.
- Once on the document signature screen, read the document carefully.
- To validate the document signature, click the red 'Validate' button on the bottom-right corner of the screen.
All Signers will be notified via email about the Validator's decision.

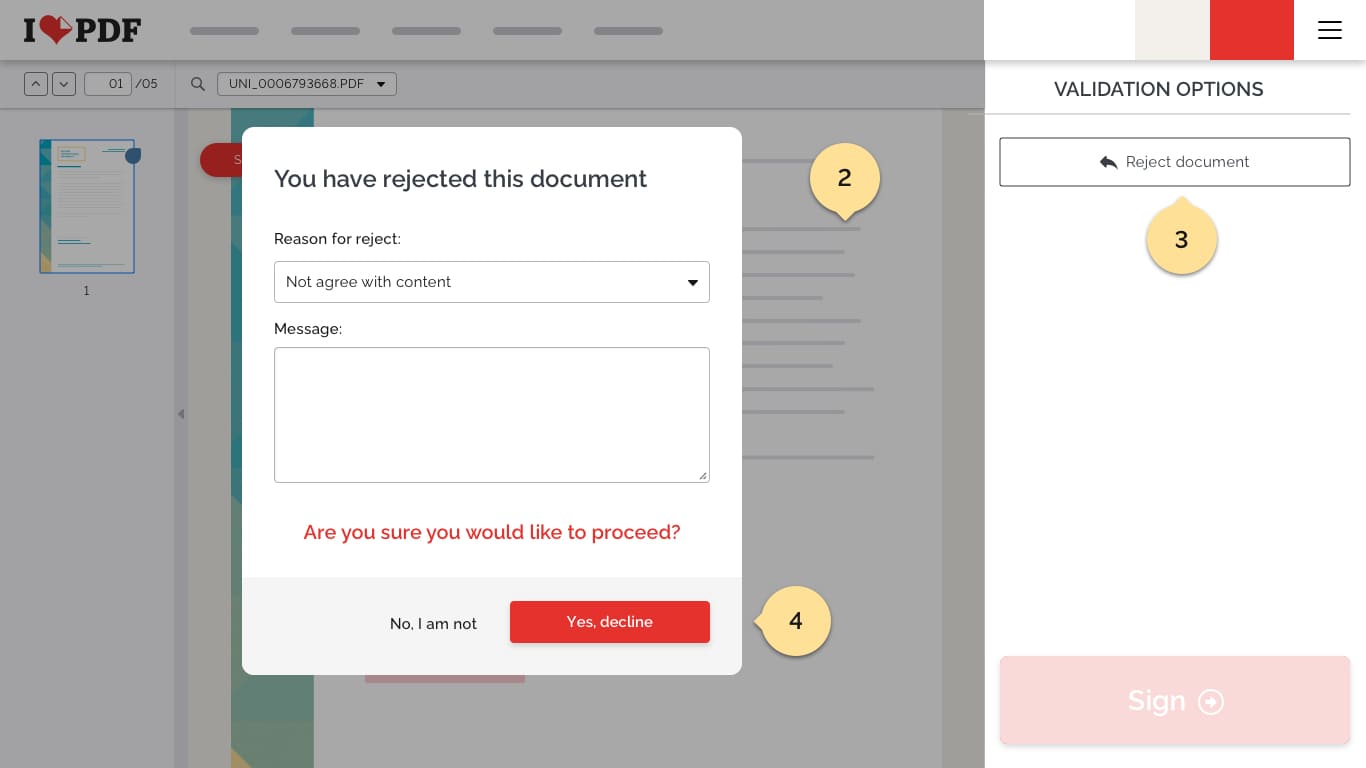
Rejecting a document
As a Validator, there can be a number of reasons for rejecting documents. Validators have the option to reject documents and give reasons for rejection to help amend the next document.
- Open the email request and click the Review and validate button.
- Once on the document signature screen, read the document carefully.
- To reject the document signature, click on the 'Reject document' button on the right side panel.
- A popup will ask you to choose a Reason for rejection and optionally write a message with your disagreement reasons.
All Signers will be notified via email about the Validator’s decision.

Settings & Customizations
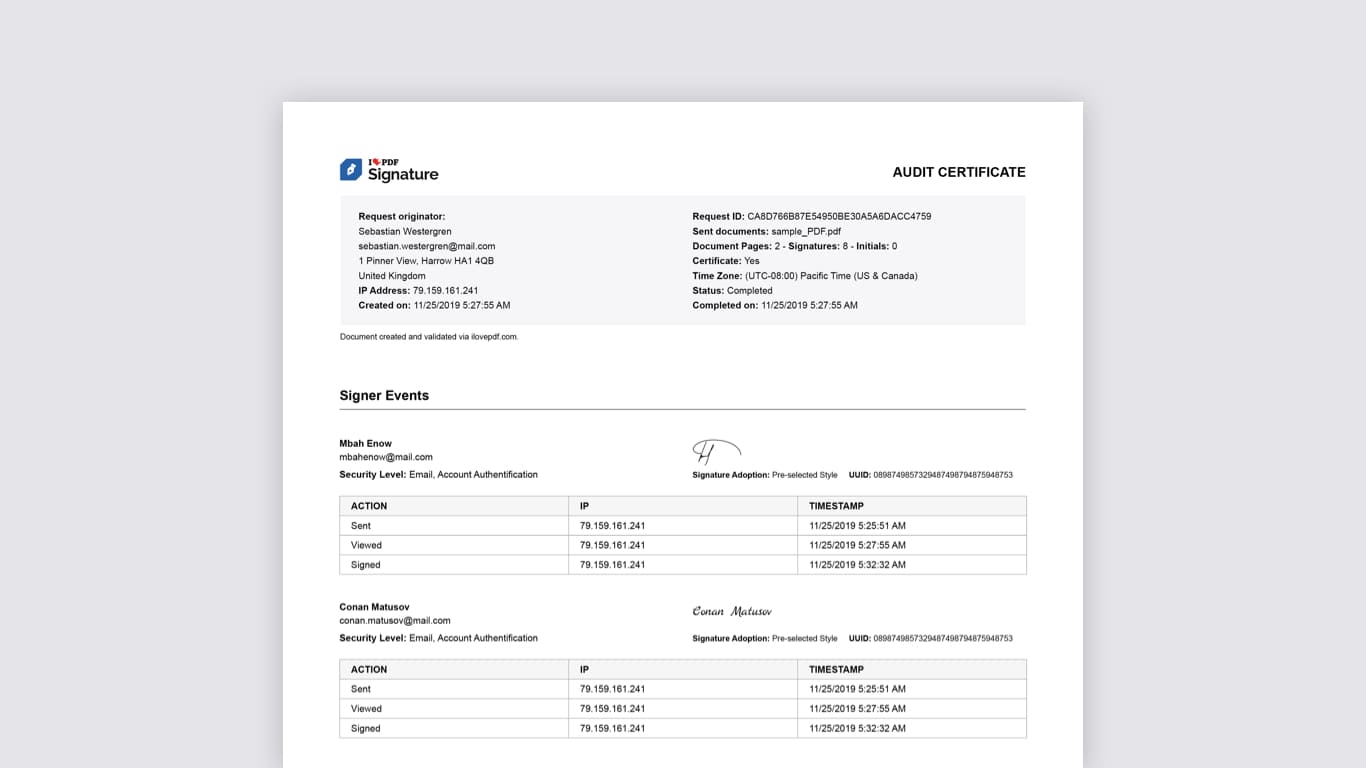
Audit Trail
iLovePDF Signature securely tracks and stores any transaction which occurred during the signing process. This means from the initial request to the last signature, including every email sent and document reviewed.
This information is available to review for iLovePDF registered users in the Signature administration panel with every step printed in a detailed history log.
For those documents signed with a Digital Signature, once a document has been completed, this log is then translated into a comprehensible Audit Trail and attached to your final signed document. It is available to download together with the signed document or separately.
This Audit trail is also a certified document and gives legally binding protection to the signing process in front of a legal court.
How to start using Digital Signatures
With iLovePDF Signature you can sign with a Simple electronic signature or a Digital Signature. Although the Simple signature provides proof that several identified entities have signed a document, the Digital Signature legally certifies the signed document. This prevents anyone from manipulating the document without invalidating the signature agreement.
To sign with a Digital Signature, certificate-based Signature packages are available for purchase on our pricing page. Alternatively, you can subscribe to iLovePDF Premium which includes five Digital Signatures renewed monthly.
How to buy Signature packages
- Create a Signature Request or select to sign your own document.
- On the document setup screen, click on the Digital button on the right side panel.
- If you do not own Digital Signatures, a purchasing popup will appear.
- Choose between one of the available packages.
- Confirm your payment.
- Once your payment is confirmed, you will be able to start using your Digital Signatures.
Although you can always buy Certified signatures from our Pricing page, you won't be required to purchase more until your amount is depleted.
Languages supported
iLovePDF Signature is available in the following 25 languages, making it easier for users worldwide to send and receive Signature Requests in their native language.
- English
- Español
- Français
- Deutsch
- Italiano
- Português
- 日本語
- Pусский
- 한국어
- 한국어
- 中文 (简体)
- 中文 (繁體)
- العربية
- Български
- Català
- Dutch
- Ελληνικά
- हिन्दी
- हिन्दी
- Bahasa Indonesia
- Bahasa Melayu
- Polski
- Svenska
- ภาษาไทย
- Türkçe
- Українська
- Tiếng Việt
Email notifications
iLovePDF Signature provides email notifications to senders and recipients for many different scenarios. By default, all of the notifications are turned on, but they can be turned off depending on your preferences from your user Panel.